Some folks have asked about USA holidays such as Thanksgiving, Labor Day, Memorial Day, etc.
Download DateBook+ Holiday updater from PdaWax.com and follow the instructions enclosed in the zip file.
Some folks have asked about USA holidays such as Thanksgiving, Labor Day, Memorial Day, etc.
Download DateBook+ Holiday updater from PdaWax.com and follow the instructions enclosed in the zip file.
Follow these instructions to subscribe to a Hebcal Jewish Calendar 5-year feed for BlackBerry Desktop Manager on macOS:

If you’re having difficulty using the default importing Hebcal to Google Calendar instructions, here is an alternative technique to try that replaces the “subscribe” step with downloading and uploading.
Note that this technique requires a laptop/desktop computer (macOS, Windows, Linux), and generally will not work on a tablet or a phone.
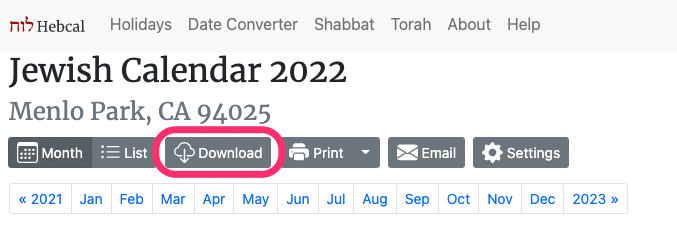
1. In your web browser, navigate to https://www.hebcal.com/hebcal if you’re downloading a holiday calendar, or https://www.hebcal.com/yahrzeit if you’re downloading a Yahrzeit + Anniversary calendar.
2. Fill out the form with your preferences and click the Create Calendar button
3. Click the Download… button
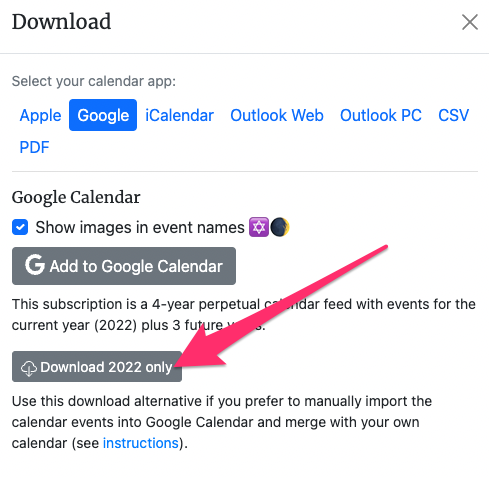
4. Select the Google Calendar option from the Download dialog box
5. Click on the “Download YYYY only” button to download the hebcal_YYYY.ics file to your desktop
6. If presented with a dialog box, be sure to chose the “Save File”, not “Open With …”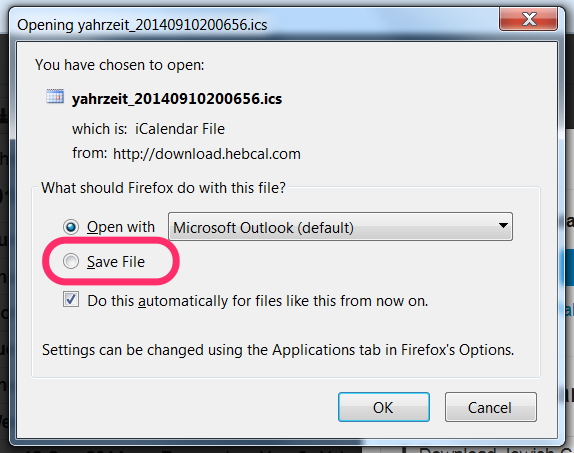
7. After the .ics file has downloaded, do not open it on your desktop.
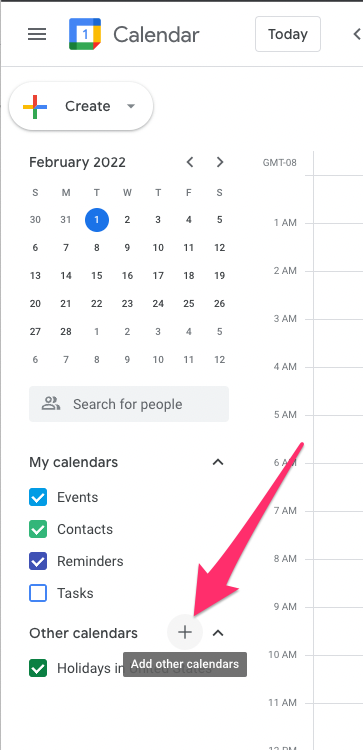
8. Return to your web browser and visit Google Calendar
9. Click the large + (Plus) button next to the “Other calendars” list on the left-hand side of the page
10. Select “Create new calendar”. A separate calendar allows you to assign a different color and notifications to events.
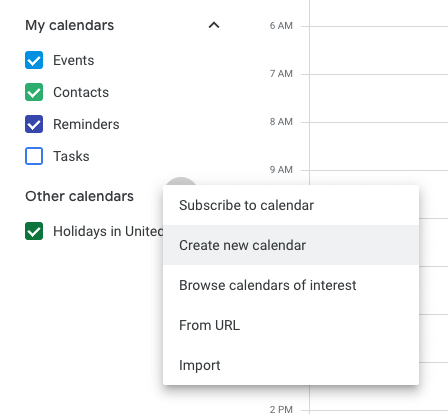
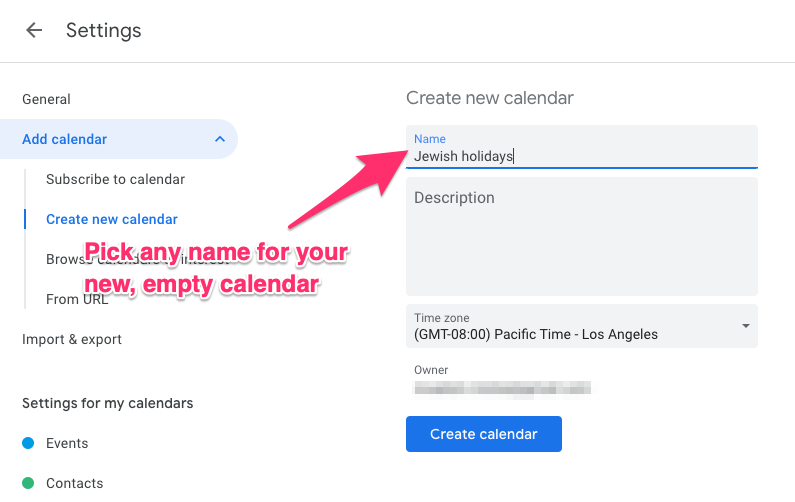
11. On the “Create new calendar page”, type the name “Hebcal” or “Jewish holidays” or whatever you’d like to call it, and click the blue Create calendar button
12. Back on the mail Google Calendar page, once again click the large + (Plus) button next to the “Other calendars” list on the left-hand side of the page
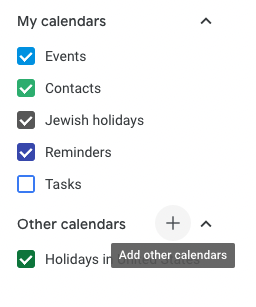
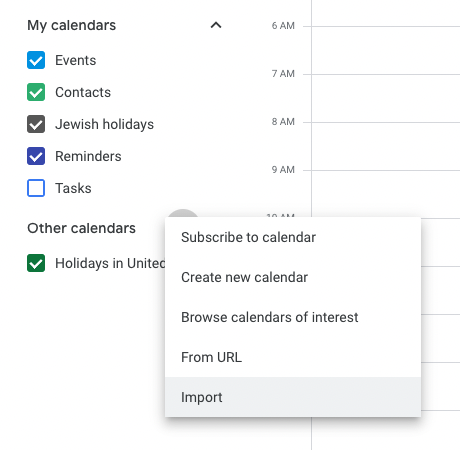
13. Select Import from the pop-up menu
14. Click on the grey Select file from your computer box, browse to your Downloads folder, choose the hebcal_YYYY.ics file that contains your events, then click Open

15. Change the calendar option from the default (e.g. “Events”) calendar to your new, separate “Jewish holidays” calendar that you created earlier in Step 10.
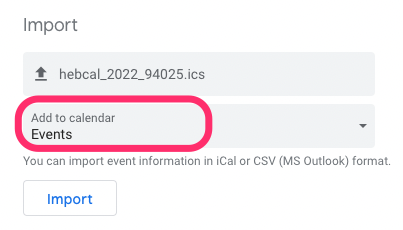
Select “Jewish holidays” instead of “Events”
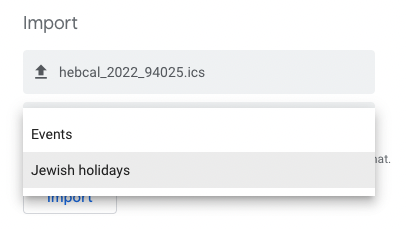
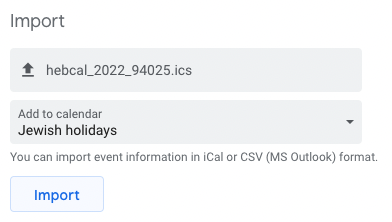
16. Confirm that the “Add to calendar” box says “Jewish holidays”, then click the import button
17. Wait a minute or two for your web browser to upload the .ics file to Google and for Google Calendar to finish processing the events.
18. Google will report that the calendar successfully imported some number of events, then click the blue OK button.
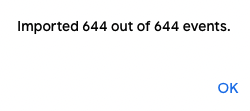
19. Congratulations! Enjoy your new calendar.
To unsubscribe from a perpetual Hebcal calendar feed in Google Calendar, you can follow the steps in Google’s Delete or unsubscribe from a calendar help article. Here is a brief summary:
Here is a more detailed version with screenshots:
1. Open a web browser on your computer and navigate to https://calendar.google.com/
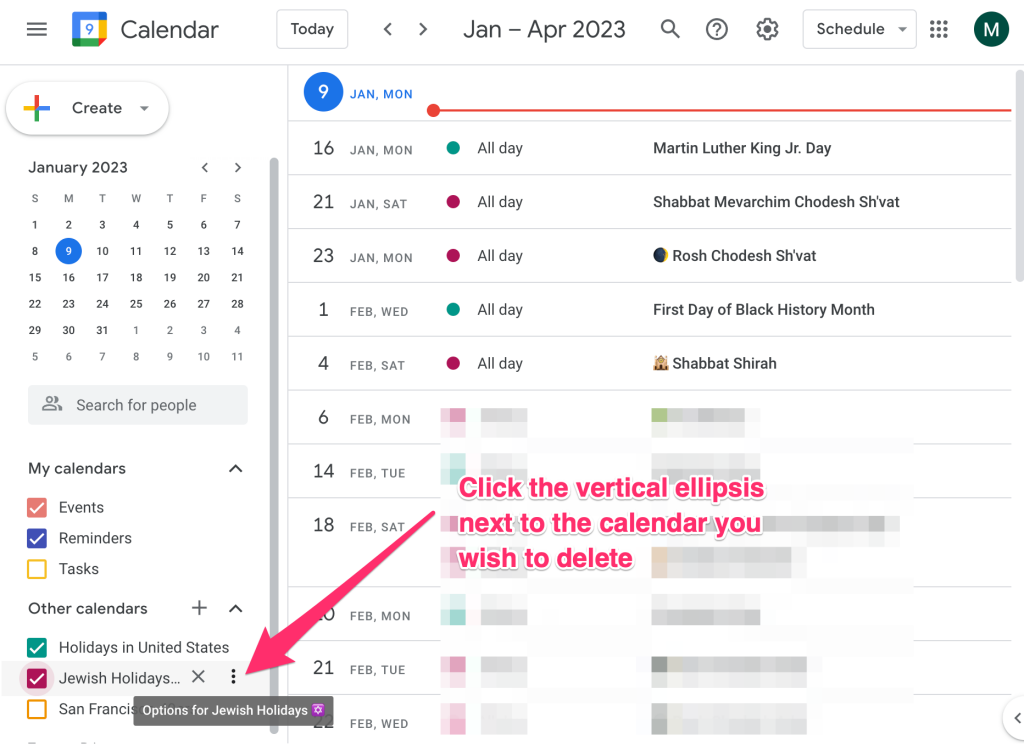
2. On the left-hand side of the page, find the Hebcal calendar you wish to remove under the Other calendars section
3. Click the vertical ellipsis (three dots) next to the calendar to bring up the context menu
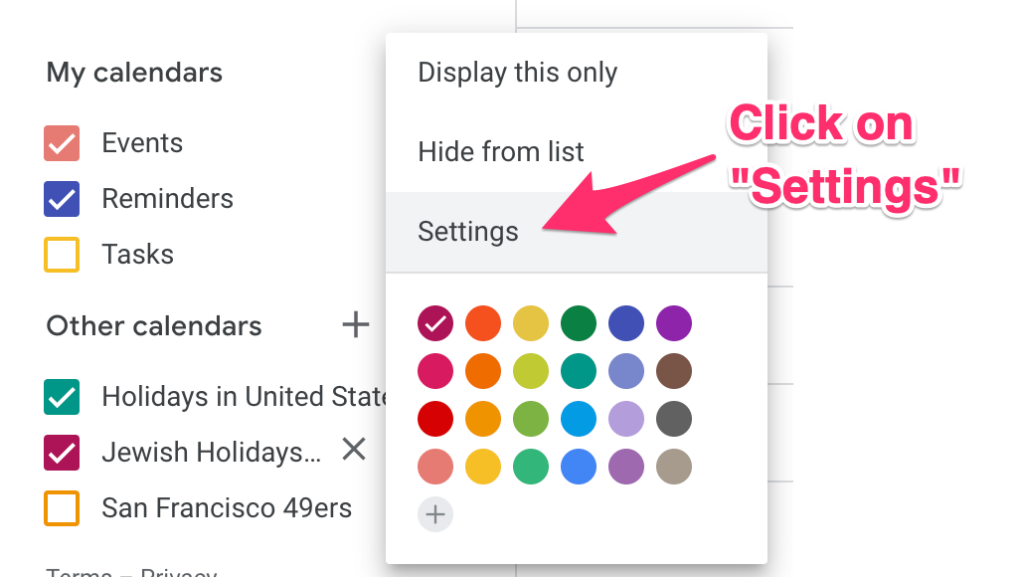
4. When the context menu pops up, click Settings
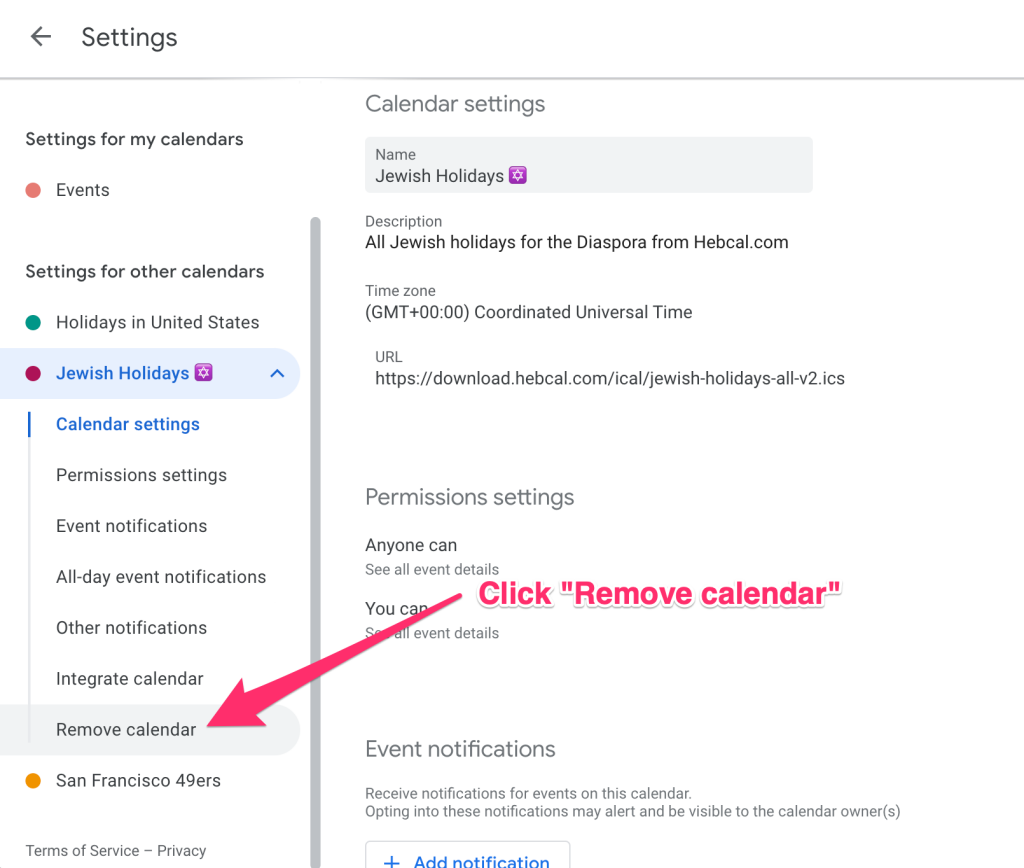
5. On the left-hand side, click Remove calendar
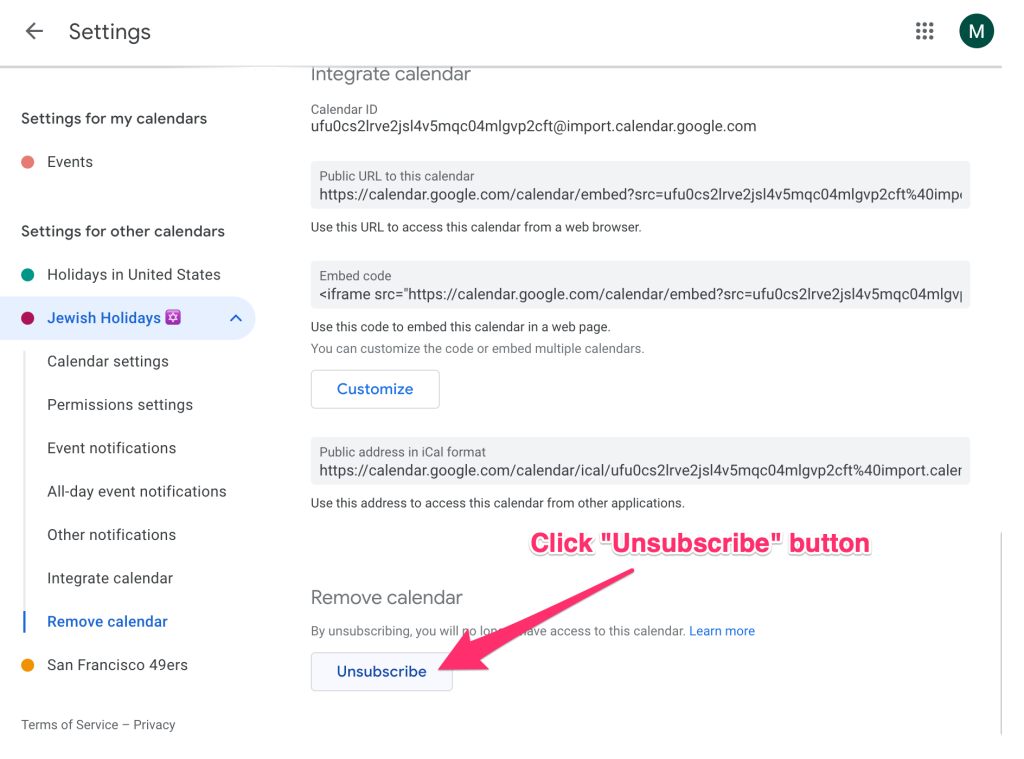
6. Click the Unsubscribe button
7. Click Remove calendar when prompted “Are you sure you want to remove Jewish Holidays ✡️? You’ll no longer have access to this calendar and its events.”

Some users have a mismatch between the date format they are downloading (USA vs. European) and the setting you’re using in your control panel. This usually results in events that were supposed to take place, for example, on September 2nd instead showing up on February 9th (i.e. the date “9/2” vs. the date “2/9”).
If you downloaded a calendar with the wrong dates for events, follow our delete Hebcal Jewish calendar from Outlook instructions to make it quick and painless to remove the incorrect information.
To find out the root cause of the mismatch, go to “Regional Options” Control Panel and pick “Date”, and compare the date format you’re using. For example:
![[Regional Options Dialog Box]](https://www.hebcal.com/i/regional-options-date.gif)
If it says “M/d/yyyy” like mine does, be sure to download the USA format from hebcal.com. If it says “dd-MMM-yy”, be sure to download European format from hebcal.com.